Quick Refresh : Spring Boot
What is the core problem that Spring Framework solves?
A most important feature of the Spring Framework is Dependency Injection. At the core of all Spring Modules is Dependency Injection or IOC Inversion of Control.
Why is this important? Because, when DI or IOC is used properly, we can develop loosely coupled applications. And loosely-coupled applications can be easily unit tested.
Let’s consider a simple example:
Example without Dependency Injection
Consider the example below:
WelcomeController depends on WelcomeService to get the welcome message.
What is it doing to get an instance of WelcomeService?
WelcomeService service = new WelcomeService();.
It’s creating an instance of it. And that means they are tightly coupled. For example : If I create an mock for WelcomeService in a unit test for WelcomeController, How do I make WelcomeController use the mock? Not easy!
@RestController
public class WelcomeController {
private WelcomeService service = new WelcomeService();
@RequestMapping("/welcome")
public String welcome() {
return service.retrieveWelcomeMessageSame Example with Dependency Injection
World looks much easier with dependency injection. You let the spring framework do the hard work. We just use two simple annotations: @Component and @Autowired.
- Using
@Component, we tell Spring Framework - Hey there, this is a bean that you need to manage. - Using
@Autowired, we tell Spring Framework - Hey find the correct match for this specific type and autowire it in.
In the example below, Spring framework would create a bean for WelcomeService and autowire it into WelcomeController.
In a unit test, I can ask the Spring framework to auto-wire the mock of WelcomeService into WelcomeController. (Spring Boot makes things easy to do this with @MockBean. But, that’s a different story altogether!)
@Component
public class WelcomeService {
//Bla Bla Bla
}
@RestController
public class WelcomeController {
@Autowired
private WelcomeService service;
@RequestMapping("/welcome")
public String welcome() {
return service.retrieveWelcomeMessageWhat else does Spring Framework solve?
Problem 1 : Duplication/Plumbing Code
Does Spring Framework stop with Dependency Injection? No. It builds on the core concept of Dependency Injection with a number of Spring Modules
- Spring JDBC
- Spring MVC
- Spring AOP
- Spring ORM
- Spring JMS
- Spring Test
Consider Spring JMS and Spring JDBC for a moment.
Do these modules bring in any new functionality? No. We can do all this with J2EE or JEE. So, what do these bring in? They bring in simple abstractions. Aim of these abstractions is to
- Reduce Boilerplate Code/ Reduce Duplication
- Promote Decoupling/ Increase Unit Testablity
For example, you need much less code to use a JDBCTemplate or a JMSTemplate compared to traditional JDBC or JMS.
Problem 2 : Good Integration with Other Frameworks.
The great thing about Spring Framework is that it does not try to solve problems that are already solved. All that it does is to provide great integration with frameworks that provide great solutions.
- Hibernate for ORM
- iBatis for Object Mapping
- JUnit & Mockito for Unit Testing
What is the core problem that Spring MVC Framework solves?
Spring MVC Framework provides decoupled way of developing web applications. With simple concepts like Dispatcher Servlet, ModelAndView and View Resolver, it makes it easy to develop web applications.
Why do we need Spring Boot?
Spring-based applications have a lot of configuration.
When we use Spring MVC, we need to configure component scan, dispatcher servlet, a view resolver, web jars(for delivering static content) among other things.
<bean
class="org.springframework.Below code snippet shows typical configuration of a dispatcher servlet in a web application.
<servlet>
<servlet-name>dispatcher</When we use Hibernate/JPA, we would need to configure a datasource, an entity manager factory, a transaction manager among a host of other things.
<bean id="dataSource" class="com.mchange.v2.c3p0.Problem #1 : Spring Boot Auto Configuration: Can we think different?
Spring Boot brings in new thought process around this.
Can we bring more intelligence into this? When a spring MVC jar is added into an application, can we auto-configure some beans automatically?
- How about auto-configuring a Data Source if Hibernate jar is on the classpath?
- How about auto-configuring a Dispatcher Servlet if Spring MVC jar is on the classpath?
There would be provisions to override the default auto-configuration.
Spring Boot looks at a) Frameworks available on the CLASSPATH b) Existing configuration for the application. Based on these, Spring Boot provides basic configuration needed to configure the application with these frameworks. This is called
Auto Configuration.
Problem #2 : Spring Boot Starter Projects : Built around well known patterns
Let’s say we want to develop a web application.
First of all we would need to identify the frameworks we want to use, which versions of frameworks to use and how to connect them together.
All web application have similar needs. Listed below are some of the dependencies we use in our Spring MVC Course. These include Spring MVC, Jackson Databind (for data binding), Hibernate-Validator (for server side validation using Java Validation API) and Log4j (for logging). When creating this course, we had to choose the compatible versions of all these frameworks.
<dependency>
<groupId>org.springframework</Here’s what the Spring Boot documentation says about starters.
Starters are a set of convenient dependency descriptors that you can include in your application. You get a one-stop-shop for all the Spring and related technology that you need, without having to hunt through sample code and copy paste loads of dependency descriptors. For example, if you want to get started using Spring and JPA for database access, just include the spring-boot-starter-data-jpa dependency in your project, and you are good to go.
Let’s consider an example starter - Spring Boot Starter Web.
If you want to develop a web application or an application to expose restful services, Spring Boot Start Web is the starter to pick. Lets create a quick project with Spring Boot Starter Web using Spring Initializr.
Dependency for Spring Boot Starter Web
<dependency>
<groupId>org.springframework.Following screenshot shows the different dependencies that are added in to our application
Dependencies can be classified into:
- Spring - core, beans, context, aop
- Web MVC - (Spring MVC)
- Jackson - for JSON Binding
- Validation - Hibernate Validator, Validation API
- Embedded Servlet Container - Tomcat
- Logging - logback, slf4j
Any typical web application would use all these dependencies. Spring Boot Starter Web comes pre packaged with these. As a developer, I would not need to worry about either these dependencies or their compatible versions.
Spring Boot Starter Project Options
As we see from Spring Boot Starter Web, starter projects help us in quickly getting started with developing specific types of applications.
- spring-boot-starter-web-
services - SOAP Web Services - spring-boot-starter-web - Web & RESTful applications
- spring-boot-starter-test - Unit testing and Integration Testing
- spring-boot-starter-jdbc - Traditional JDBC
- spring-boot-starter-hateoas - Add HATEOAS features to your services
- spring-boot-starter-security - Authentication and Authorization using Spring Security
- spring-boot-starter-data-jpa - Spring Data JPA with Hibernate
- spring-boot-starter-cache - Enabling Spring Framework’s caching support
- spring-boot-starter-data-rest - Expose Simple REST Services using Spring Data REST
Other Goals of Spring Boot
There are a few starters for technical stuff as well
- spring-boot-starter-actuator - To use advanced features like monitoring & tracing to your application out of the box
- spring-boot-starter-undertow, spring-boot-starter-jetty, spring-boot-starter-tomcat - To pick your specific choice of Embedded Servlet Container
- spring-boot-starter-logging - For Logging using logback
- spring-boot-starter-log4j2 - Logging using Log4j2
Spring Boot aims to enable production ready applications in quick time.
- Actuator : Enables Advanced Monitoring and Tracing of applications.
- Embedded Server Integrations - Since server is integrated into the application, I would NOT need to have a separate application server installed on the server.
- Default Error Handling
All Spring Boot projects typically use spring-boot-starter-parent as the parent in pom.xml.
<parent>
<groupId>org.springframework.Parent Poms allow you to manage the following things for multiple child projects and modules:
- Configuration - Java Version and Other Properties
- Depedency Management - Version of dependencies
- Default Plugin Configuration
What is inside Spring Boot Starter Parent?
First of all - Spring Boot Starter Parent defines spring-boot-dependencies as the parent pom. It inherits dependency management from spring-boot-dependencies. Details in the next section.
<parent>
<groupId>org.springframework.Default java version is 1.6. A project can override this by specifying a property <java.version>1.8</ in the project pom. A few other settings related to encoding and source, target version are also set in the parent pom.
<java.version>1.6</java.Spring Boot Starter Parent specifies the default configuration for a host of plugins including maven-failsafe-plugin, maven-jar-plugin and maven-surefire-plugin.
<plugin>
<groupId>org.apache.maven.What does Spring Boot Starter Parent inherit from spring-boot-dependencies?
Spring Boot Dependencies defines the default dependency management for all Spring Boot projects. If we would want to use a new version of a specific dependency, we can override the version by specifying a new property in the project pom. The extract below shows some of the important dependencies that are managed by Spring Boot Dependencies parent pom. Since Spring Boot Starter Parent inherit from spring-boot-dependencies, it shares all these characteristics as well.
<properties>
<activemq.version>5.13.4</Defines Maven 3.2.1 as the minimum version needed.
<prerequisites>
	<maven>3.2.1</maven>
</prerequisites>
Why do we need Spring Boot Auto Configuration?
Spring based applications have a lot of configuration. When we use Spring MVC, we need to configure component scan, dispatcher servlet, a view resolver, web jars(for delivering static content) among other things.
<bean
class="org.springframework.Below code snippet shows typical configuration of a dispatcher servlet in a web application.
<servlet>
<servlet-name>dispatcher</When we use Hibernate/JPA, we would need to configure a datasource, an entity manager factory, a transaction manager among a host of other things.
<bean id="dataSource" class="com.mchange.v2.c3p0.Above examples are typical with any Spring framework implementation or integration with other frameworks.
Spring Boot : Can we think different?
Spring Boot brings in new thought process around this.
Can we bring more intelligence into this? When a spring mvc jar is added into an application, can we auto configure some beans automatically?
- How about auto configuring a Data Source if Hibernate jar is on the classpath?
- How about auto configuring a Dispatcher Servlet if Spring MVC jar is on the classpath?
There would be provisions to override the default auto configuration.
Spring Boot looks at a) Frameworks available on the CLASSPATH b) Existing configuration for the application. Based on these, Spring Boot provides basic configuration needed to configure the application with these frameworks. This is called
Auto Configuration.
As soon as we added in Spring Boot Starter Web as a dependency in our project, Spring Boot Autoconfiguration sees that Spring MVC is on the classpath. It autoconfigures dispatcherServlet, a default error page and webjars.
If you add Spring Boot Data JPA Starter, you will see that Spring Boot Auto Configuration auto configures a datasource and an Entity Manager.
Where is Spring Boot Auto Configuration implemented?
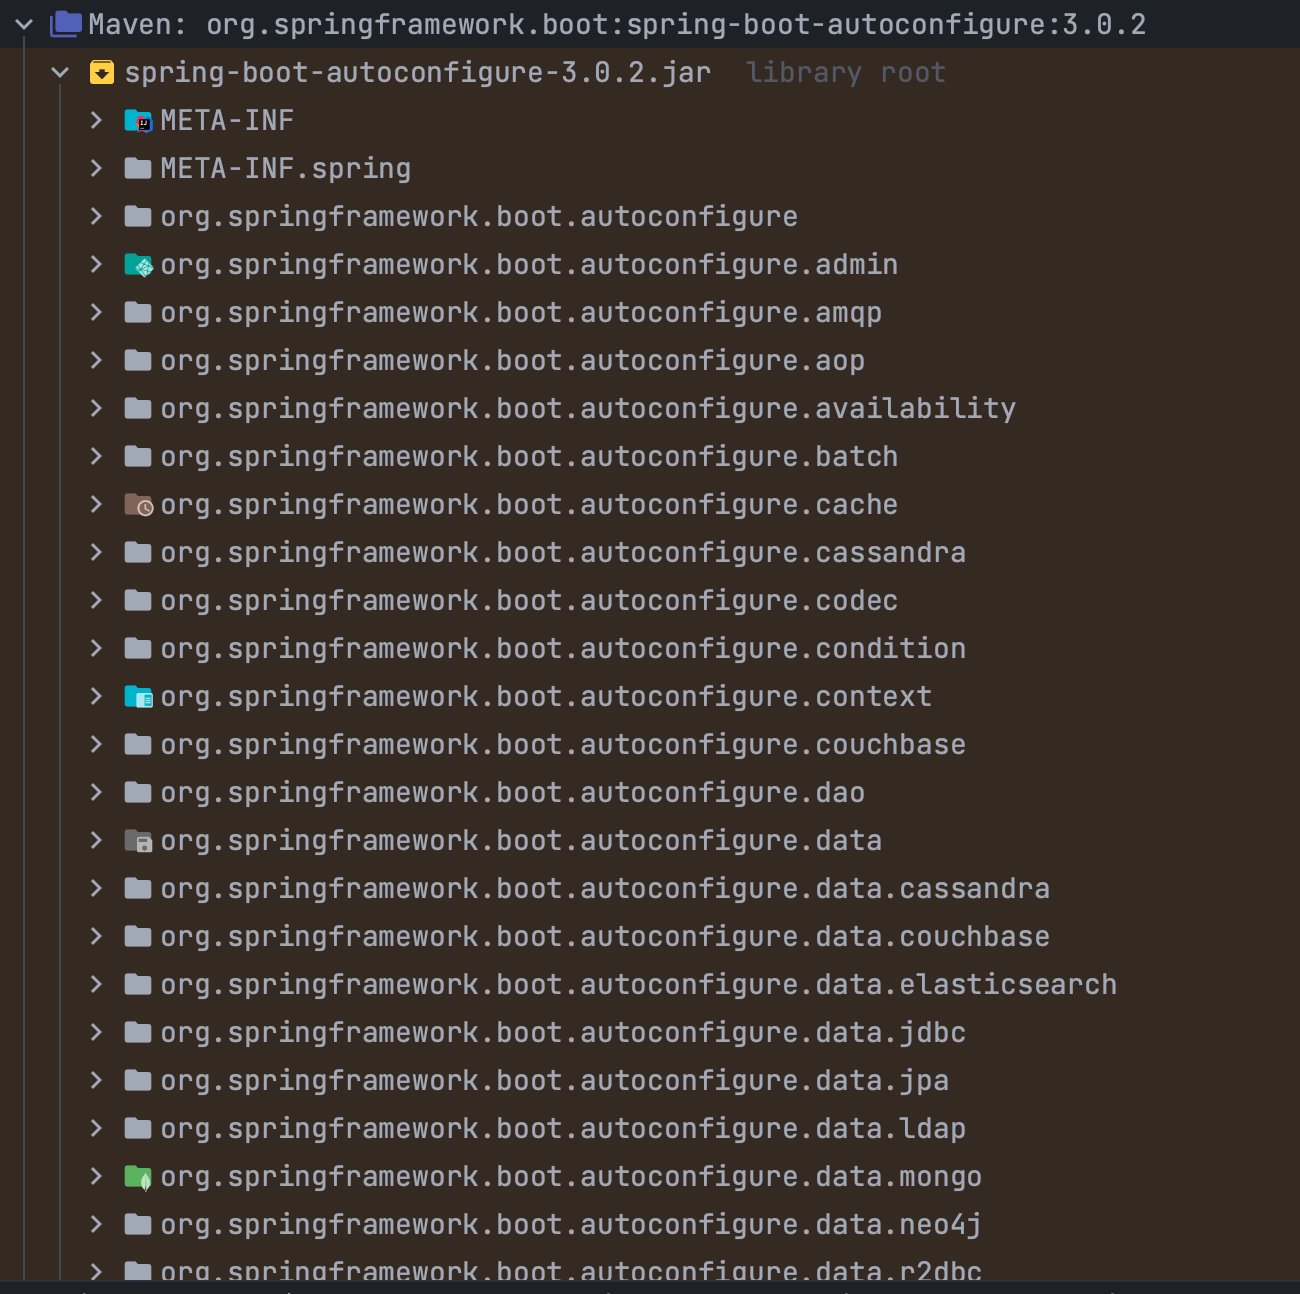
All auto configuration logic is implemented in spring-boot-autoconfigure.. All auto configuration logic for mvc, data, jms and other frameworks is present in a single jar.
Other important file inside spring-boot-autoconfigure.jar is /META-INF/spring.factories. This file lists all the auto configuration classes that should be enabled under the EnableAutoConfiguration key.
org.springframework.boot.Example Auto Configuration
We will take a look at DataSourceAutoConfiguration.
Typically all Auto Configuration classes look at other classes available in the classpath. If specific classes are available in the classpath, then configuration for that functionality is enabled through auto configuration. Annotations like @ConditionalOnClass, @ConditionalOnMissingBean help in providing these features!
@ConditionalOnClass({ DataSource.class, EmbeddedDatabaseType.class }) : This configuration is enabled only when these classes are available in the classpath.
@Configuration
@ConditionalOnClass({ DataSource.class, EmbeddedDatabaseType.class })
@@ConditionalOnMissingBean : This bean is configured only if there is no other bean configured with the same name.
@Bean
@ConditionalOnMissingBean
public DataSourceInitializer dataSourceInitializer() {
	return new DataSourceInitializer();
}
Embedded Database is configured only if there are no beans of type DataSource.class or XADataSource.class already configured.
@Conditional(EmbeddedDatabaseCDebugging Auto Configuration
There are two ways you can debug and find more information about auto configuration.
- Turning on debug logging
- Using Spring Boot Actuator
Debug Logging
You can turn debug logging by adding a simple property value to application.properties. In the example below, we are turning on Debug level for all logging from org.springframework package (and sub packages).
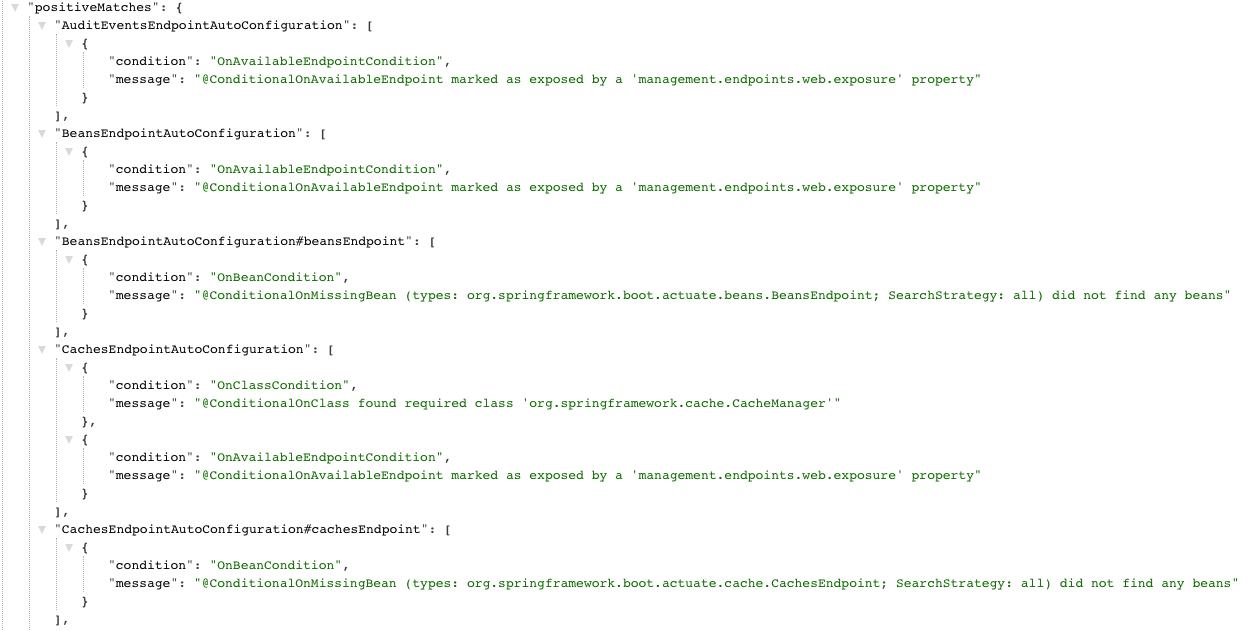
logging.level.org.When you restart the application, you would see an auto configuration report printed in the log. Similar to what you see below, a report is produced including all the auto configuration classes. The report separates the positive matches from negative matches. It will show why a specific bean is auto configured and also why something is not auto configured.
=========================
AUTO-CONFIGURATION REPORT
=========================
Positive matches:
-----------------
DispatcherServletAutoConfiguraSpring Boot Actuator
Other way to debug auto configuration is to add spring boot actuator to your project. We will also add in HAL Browser to make things easy.
<dependency>
<groupId>org.springframework.HAL Browser auto configuration http://
Why do we need Spring Boot Starter Projects?
To understand what starter projects provide, let’s consider an example project without using a starter.
What if we do not have starter projects?
Let’s say we want to develop a web application with Spring MVC.
First of all we would need to identify the frameworks we want to use, which versions of frameworks to use and how to connect them together.
Listed below are some of the dependencies we use in our Spring MVC Course. These include Spring MVC, Jackson Databind (for data binding), Hibernate-Validator (for server side validation using Java Validation API) and Log4j (for logging). When creating this course, we had to choose the compatible versions of all these frameworks.
<dependency>
<groupId>org.springframework</We had to add configuration to get all the stuff wired together. Configuration for dispatcher servlet, view resolver, error page, web jars among other configuration.
<bean
class="org.springframework.When using JPA, we would need to similar stuff. We need to add the jars and the configuration for datasource, entity manager, transaction manager etc.
<bean id="dataSource" class="com.mchange.v2.c3p0.Spring Boot Starter Projects
Starters are a set of convenient dependency descriptors that you can include in your application. You get a one-stop-shop for all the Spring and related technology that you need, without having to hunt through sample code and copy paste loads of dependency descriptors. For example, if you want to get started using Spring and JPA for database access, just include the spring-boot-starter-data-jpa dependency in your project, and you are good to go.
Let’s consider an example starter - Spring Boot Starter Web.
If you want to develop a web application or an application to expose restful services, Spring Boot Start Web is the starter to pick. Lets create a quick project with Spring Boot Starter Web using Spring Initializr.
Creating REST Services Application with Spring Initializr
Spring Initializr http://start.
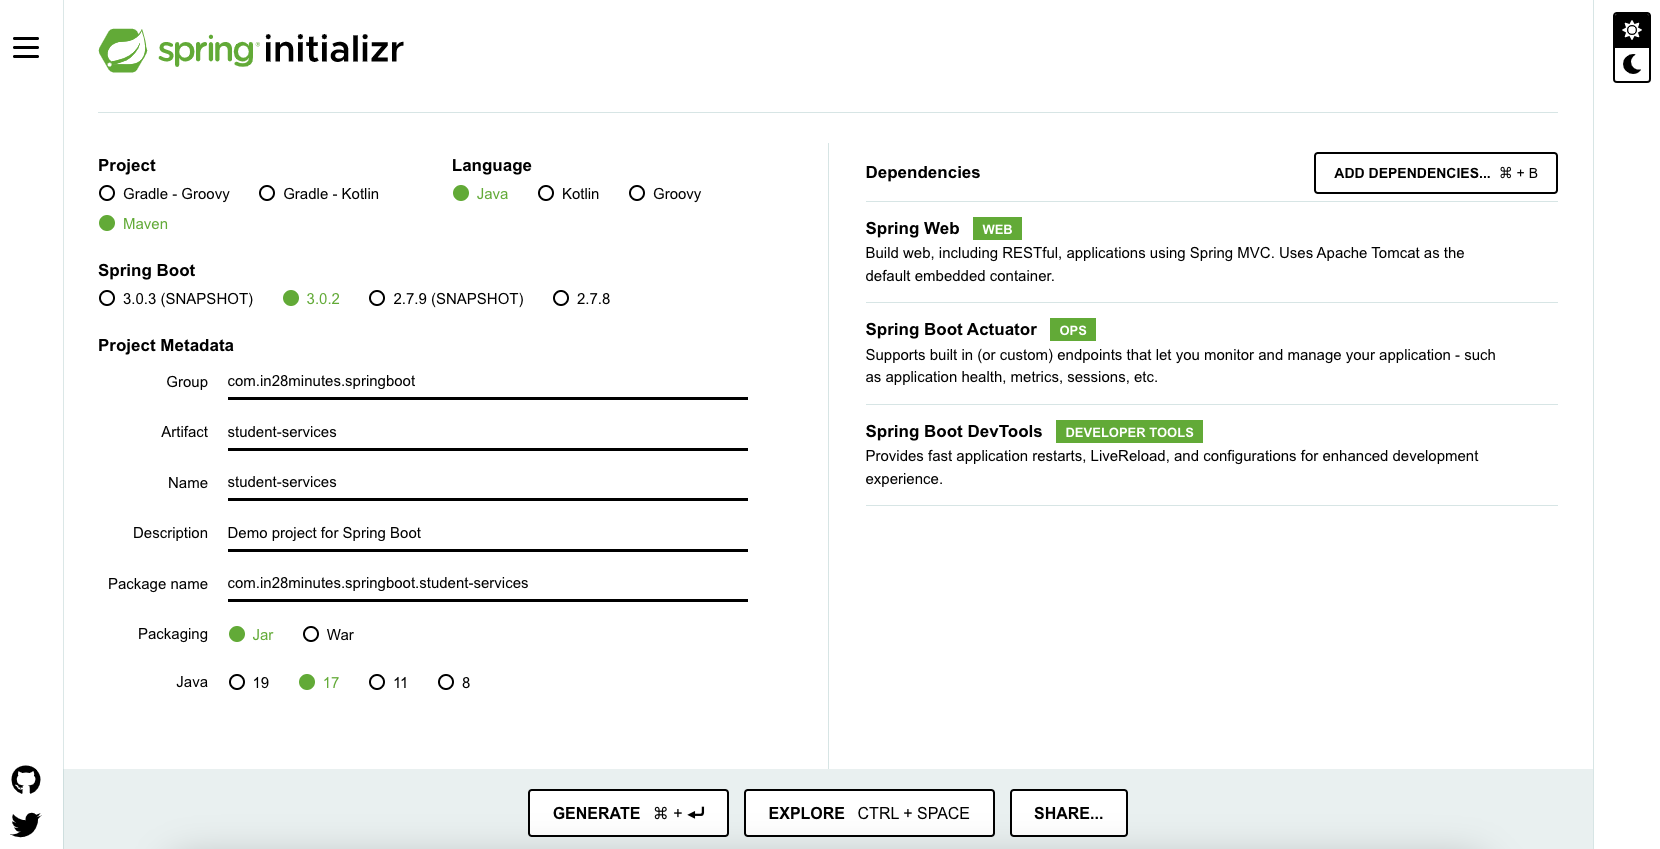
As shown in the image above, following steps have to be done.
- Launch Spring Initializr and choose the following
- Choose
com.in28minutes.as Groupspringboot - Choose
student-servicesas Artifact - Choose following dependencies
- Web
- Choose
- Click Generate Project.
- Import the project into Eclipse.
- If you want to understand all the files that are part of this project, you can go here.
Spring Boot Starter Web
Spring Boot Starter Web brings in 2 important features
- Compatible Dependencies that are needed to develop web applications
- Auto Configuration
Dependency for Spring Boot Starter Web
<dependency>
<groupId>org.springframework.Dependencies
Following screenshot shows the different dependencies that are added in to our application
Dependencies can be classified into:
- Spring - core, beans, context, aop
- Web MVC - (Spring MVC)
- Jackson - for JSON Binding
- Validation - Hibernate Validator, Validation API
- Embedded Servlet Container - Tomcat
- Logging - logback, slf4j
Any typical web application would use all these dependencies. Spring Boot Starter Web comes pre packaged with these. As a developer, I would not need to worry about either these dependencies or their compatible versions.
Auto Configuration
Spring Boot Starter Web auto configures the basic things that are needed. To understand the features Spring Boot Starter Web brings in, lets run StudentServicesApplication.
Mapping servlet: 'dispatcherServlet' to [/]
Mapped "{[/error]}" onto public org.springframework.http.Spring Boot Starter Web auto-configures
- Dispatcher Servlet
- Error Page
- Web Jars to manage your static dependencies
- Embedded Servlet Container - Tomcat is the default
The image below shows the different things that might be auto configured by Spring Boot Starter Web
Spring Boot Starter Project Options
As we see from Spring Boot Starter Web, starter projects help us in quickly getting started with developing specific types of applications.
- spring-boot-starter-web-
services - SOAP Web Services - spring-boot-starter-web - Web & RESTful applications
- spring-boot-starter-test - Unit testing and Integration Testing
- spring-boot-starter-jdbc - Traditional JDBC
- spring-boot-starter-hateoas - Add HATEOAS features to your services
- spring-boot-starter-security - Authentication and Authorization using Spring Security
- spring-boot-starter-data-jpa - Spring Data JPA with Hibernate
- spring-boot-starter-cache - Enabling Spring Framework’s caching support
- spring-boot-starter-data-rest - Expose Simple REST Services using Spring Data REST
There are a few starters for technical stuff as well
- spring-boot-starter-actuator - To use advanced features like monitoring & tracing to your application out of the box
- spring-boot-starter-undertow, spring-boot-starter-jetty, spring-boot-starter-tomcat - To pick your specific choice of Embedded Servlet Container
- spring-boot-starter-logging - For Logging using logback
- spring-boot-starter-log4j2 - Logging using Log4j2
What is REST?
REST stands for REpresentational State Transfer. REST specifies a set of architectural constraints. Any service which satisfies these constraints is called RESTful Service.
The five important constraints for RESTful Web Service are
- Client - Server : There should be a service producer and a service consumer.
- The interface (URL) is uniform and exposing resources.
- The service is stateless.
- The service results should be Cacheable. HTTP cache, for example.
- Service should assume a Layered architecture. Client should not assume direct connection to server - it might be getting info from a middle layer - cache.
Richardson Maturity Model
Richardson Maturity Model is used to identify the maturity level of a Restful Web Service. Following are the different levels and their characteristics:
- Level 0 : Expose SOAP web services in REST style. Expose action based services (http://server/getPosts, http://server/deletePosts, http://server/doThis, http://server/doThat etc) using REST.
- Level 1 : Expose Resources with proper URI’s (using nouns). Ex: http://server/accounts, http://server/accounts/10. However, HTTP Methods are not used.
- Level 2 : Resources use proper URI’s + HTTP Methods. For example, to update an account, you do a PUT to . The create an account, you do a POST to . Uri’s look like posts/1/comments/5 and accounts/1/friends/1.
- Level 3 : HATEOAS (Hypermedia as the engine of application state). You will tell not only about the information being requested but also about the next possible actions that the service consumer can do. When requesting information about a facebook user, a REST service can return user details along with information about how to get his recent posts, how to get his recent comments and how to retrieve his friend’s list.
Using appropriate Request Methods
Always use HTTP Methods. Best practices with respect to each HTTP method is described below:
- GET : Should not update anything. Should be idempotent (same result in multiple calls). Possible Return Codes 200 (OK) + 404 (NOT FOUND) +400 (BAD REQUEST)
- POST : Should create new resource. Ideally return JSON with link to newly created resource. Same return codes as get possible. In addition : Return code 201 (CREATED) is possible.
- PUT : Update a known resource. ex: update client details. Possible Return Codes : 200(OK)
- DELETE : Used to delete a resource.
Project Structure
Following screenshot shows the structure of the project we will create.
A few details:
StudentController.java- Rest controller exposing all the three service methods discussed above.Course.java, Student.java, StudentService.java- Business Logic for the application. StudentService exposes a couple of methods we would consume from our Rest Controller.StudentControllerIT.java- Integration Tests for the Rest Services.StudentControllerTest.java- Unit Tests for the Rest Services.StudentServicesApplication.- Launcher for the Spring Boot Application. To run the application, just launch this file as Java Application.java pom.xml- Contains all the dependencies needed to build this project. We will use Spring Boot Starter Web.
Bootstrapping REST Services with Spring Initializr
Creating a REST service with Spring Initializr is a cake walk. We will use Spring Web MVC as our web framework.
Spring Initializr http://start.
As shown in the image above, following steps have to be done
- Launch Spring Initializr and choose the following
- Choose
com.in28minutes.as Groupspringboot - Choose
student-servicesas Artifact - Choose following dependencies
- Web
- Actuator
- DevTools
- Choose
- Click Generate Project.
- Import the project into Eclipse. File -> Import -> Existing Maven Project.
- If you want to understand all the files that are part of this project, you can go here.
Implementing Business Service for your Application
All applications need data. Instead of talking to a real database, we will use an ArrayList - kind of an in-memory data store.
A student can take multiple courses. A course has an id, name, description and a list of steps you need to complete to finish the course. A student has an id, name, description and a list of courses he/she is currently registered for. We have StudentService exposing methods to
public List<Student> retrieveAllStudents()- Retrieve details for all studentspublic Student retrieveStudent(String studentId)- Retrieve a specific student detailspublic List<Course> retrieveCourses(String studentId)- Retrieve all courses a student is registered forpublic Course retrieveCourse(String studentId, String courseId)- Retrieve details of a specific course a student is registered forpublic Course addCourse(String studentId, Course course)- Add a course to an existing student
Refer to these files at the bottom of the article for exact implementation of the Service StudentService and the model classes Course and Student.
- src/main/java/com/in28minutes/
springboot/model/Course.java - src/main/java/com/in28minutes/
springboot/model/Student.java - src/main/java/com/in28minutes/
springboot/service/ StudentService.java
Adding Couple of GET Rest Services
The Rest Service StudentController
@Autowired private StudentService studentService: We are using Spring Autowiring to wire the student service into the StudentController.@GetMapping("/students/{: Exposing a Get Service with studentId as a path variablestudentId}/courses") @GetMapping("/students/{: Exposing a Get Service for retrieving specific course of a student.studentId}/courses/{courseId}" ) @PathVariable String studentId: Value of studentId from the uri will be mapped to this parameter.
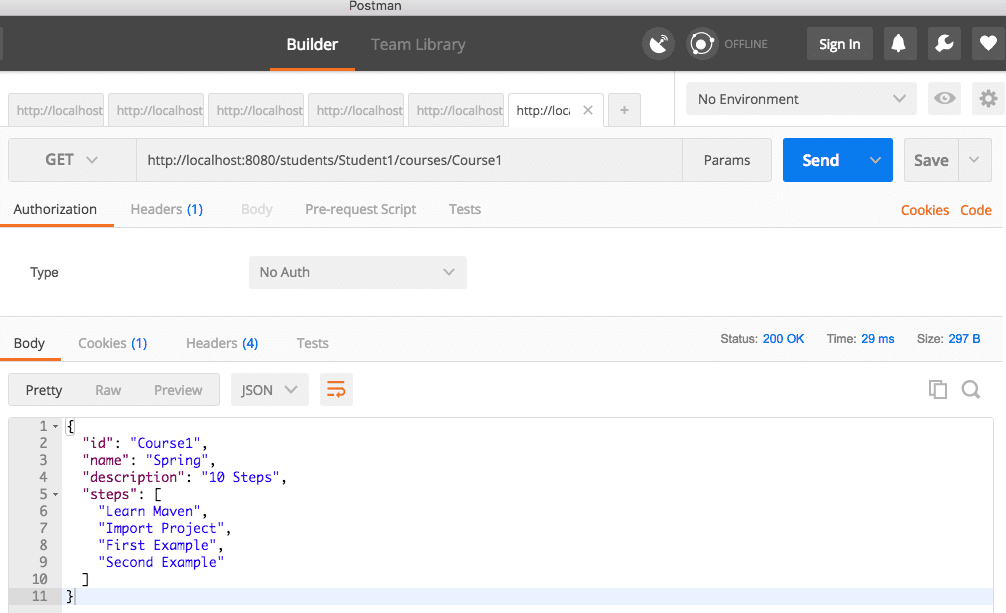
package com.in28minutes.springboot.conExecuting the Get Service Using Postman
We will fire a request to http://localhost:8080/
{
  "id": "Course1",
  "name": "Spring",
  "description": "10 Steps",
  "steps": [
    "Learn Maven",
    "Import Project",
    "First Example",
    "Second Example"
  ]
}
Below picture shows how we can execute this Get Service from Postman - my favorite tool to run rest services.
Adding a POST Rest Service
A POST Service should return a status of created (201) when the resource creation is successful.
@PostMapping("/students/{: Mapping a url for the POST Request @RequestBody Course newCourse: Using Binding to bind the body of the request to Course object. ResponseEntity.: Return a status of created. Also return the location of created resource as a Response Header.
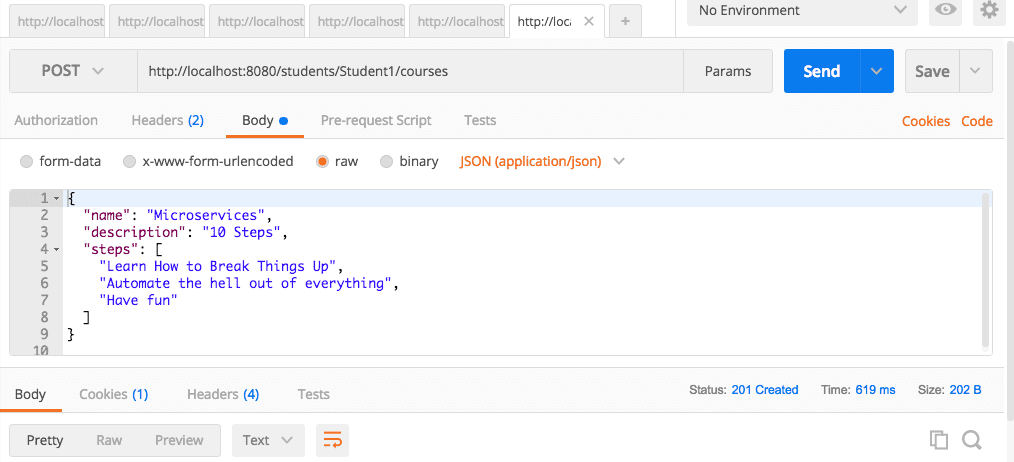
@PostMapping("/students/{Executing a POST Rest Service
Example Request is shown below. It contains all the details to register a course to a student.
{
  "name": "Microservices",
  "description": "10 Steps",
  "steps": [
    "Learn How to Break Things Up",
    "Automate the hell out of everything",
    "Have fun"
  ]
}
Below picture shows how we can execute this Post Service from Postman - my favorite tool to run rest services. Make sure you go to the Body tab and select raw. Select JSON from the dropdown. Copy above request into body.
The URL we use is http://localhost:8080/
Unit Testing the Get Rest Service
When we are unit testing a rest service, we would want to launch only the specific controller and the related MVC Components. WebMvcTest annotation is used for unit testing Spring MVC application. This can be used when a test focuses only Spring MVC components. Using this annotation will disable full auto-configuration and only apply configuration relevant to MVC tests.
@RunWith(SpringRunner.class): SpringRunner is short hand for SpringJUnit4ClassRunner which extends BlockJUnit4ClassRunner providing the functionality to launch a Spring TestContext Framework.@WebMvcTest(value = StudentController.class, secure = false): WebMvcTest annotation is used for unit testing Spring MVC application. This can be used when a test focuses only Spring MVC components. In this test, we want to launch only StudentController. All other controllers and mappings will not be launched when this unit test is executed.@Autowired private MockMvc mockMvc: MockMvc is the main entry point for server-side Spring MVC test support. It allows us to execute requests against the test context.@MockBean private StudentService studentService: MockBean is used to add mocks to a Spring ApplicationContext. A mock of studentService is created and auto-wired into the StudentController.Mockito.when(studentService.: Mocking the method retrieveCourse to return the specific mockCourse when invoked.retrieveCourse(Mockito. anyString(),Mockito.anyString( ))).thenReturn(mockCourse) MockMvcRequestBuilders.get("/: Creating a Request builder to be able to execute a get request to uri “/students/Student1/courses/students/Student1/courses/ Course1").accept(MediaType. APPLICATION_JSON) Course1” with accept header as “application/json” mockMvc.perform(: mockMvc is used to perform the request and return the response back.requestBuilder).andReturn() JSONAssert.assertEquals(: We are using org.skyscreamer.jsonassert.expected, result.getResponse(). getContentAsString(), false) JSONAssert. This allows us to do partial asserts against a JSON String. We are passing strict as false since we do not want to check for all fields in the response.
package com.in28minutes.springboot.conAdding a POST Rest Service
A POST Service should return a status of created (201) when the resource creation is successful.
@PostMapping("/students/{: Mapping a url for the POST Request @RequestBody Course newCourse: Using Binding to bind the body of the request to Course object. ResponseEntity.: Return a status of created. Also return the location of created resource as a Response Header.
@PostMapping("/students/{Executing a POST Rest Service
Example Request is shown below. It contains all the details to register a course to a student.
{
  "name": "Microservices",
  "description": "10 Steps",
  "steps": [
    "Learn How to Break Things Up",
    "Automate the hell out of everything",
    "Have fun"
  ]
}
Below picture shows how we can execute this Post Service from Postman - my favorite tool to run rest services. Make sure you go to the Body tab and select raw. Select JSON from the dropdown. Copy above request into body.
The URL we use is http://localhost:8080/
Writing Unit Test for the POST Rest Service
In the unit test, we would want to post the request body to the url /students/Student1/courses
MockMvcRequestBuilders.post("/: Create a post request with an accept header forstudents/Student1/courses"). accept(MediaType.APPLICATION_ JSON) application\jsoncontent(exampleCourseJson).: Use the specified content as body of the request and set content type header.contentType(MediaType. APPLICATION_JSON) assertEquals(HttpStatus.: Assert that the return status is CREATED.CREATED.value(), response.getStatus()) response.getHeader(: Get the location from response header and later assert that it contains the URI of the created resource.HttpHeaders.LOCATION)
@Test
public void createStudentCourse() throws Exception {
Course mockCourse = new Course("1", "Smallest Number", "1",
Arrays.asList("1", "2", "3", "4"));
// studentService.addCourse to respond back with mockCourse
Mockito.when(
studentService.addCourse(MockiWriting Integration Test for the POST Rest Service
When writing an integration test for a POST service we would want to check if the location header contains the uri of the created resource.
String actual = response.getHeaders().get(HttpHeaders.LOCATION).get(0); : Get the Location header from the response. assertTrue(actual.contains("/students/Student1/courses/")) : Assert that the header contains the uri of the newly created resource.
@Test
public void addCourse() {
Course course = new Course("Course1", "Spring", "10 Steps",
Arrays.asList("Learn Maven", "Import Project", "First Example",
"Second Example"));
HttpEntity<Course> entity = new HttpEntity<Course>(course, headers);
ResponseEntity<String> response = restTemplate.exchange(
createURLWithPort("/students/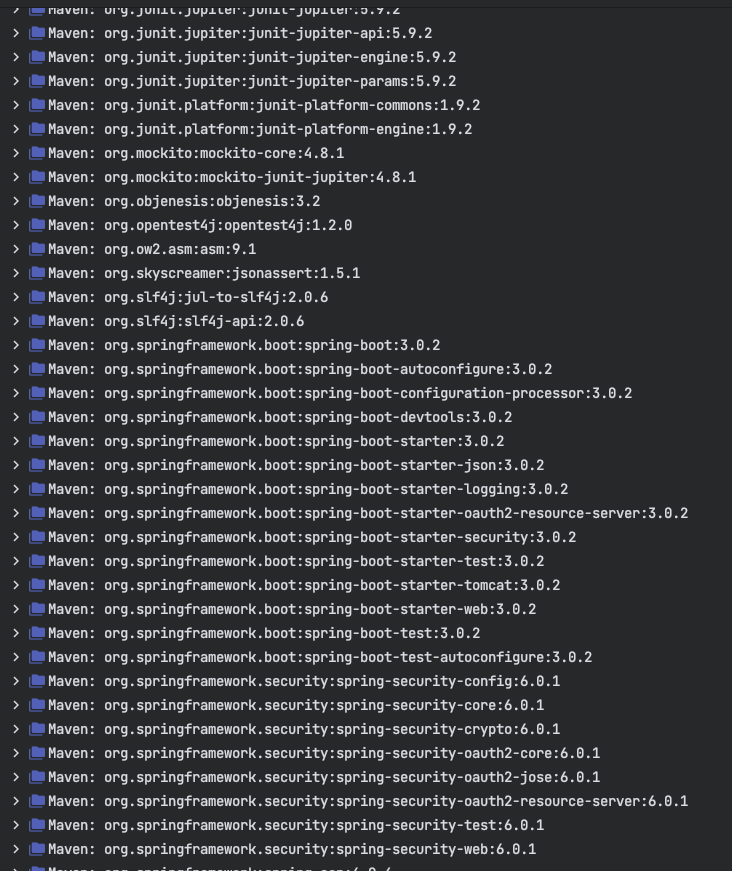





Comments
Post a Comment