Quick Refresh : jBPM
jBPM: jBPM stands for Java Business Process Management. It is a flexible business process management suite which is written in Java language. It is light-weight and fully open-source in nature. It allows us to create, deploy, execute and monitor business processes throughout their life cycle. It fills the gap between the business analysts and developers.
What is Business Process?
A Business Process is a set of activities which follows the number of steps in a specific order to fulfil the organizational goals. The order of these goals are depicted using a flowchart. These processes can significantly improve the visibility and agility of our business logic.
Every Business Process needs to be supported throughout their entire life-cycle. These life-cycle includes: authoring, deployment, process management & task lists and dashboards & reporting.
jBPM Features:

Light-Weight: jBPM is lightweight, fully open-source and written in Java language.
Support BPMN 2.0: jBPM focuses on BPMN 2.0 (Business Process Model and Notification) specification as the process definition language. BPMN 2.0 is a global standard for process modelling and is one of the core components of successful Business-IT-Alignment.
Persistence and Transaction: jBPM supports Persistence and Transactions which is based on the JPA and JTA.
UI Tools: jBPM has UI tools available in the design phase.
Eclipse-Based and Web-Based: jBPM works on Eclipse-based and Web-Based editor which provides drag and drop support for the graphical creation and simulation of our business processes.
Rule Engine: jBPM provides a Rule Engine which provides a declarative language that is used to evaluate the available information.
Human Task Service: jBPM uses a pluggable Human Task Service based on the Web Services Human Task specification. It includes tasks that need to be performed by humans. It also defines the data structure to store information about the human tasks.
jBPM Eclipse Plugin
jBPM Core-Engine API
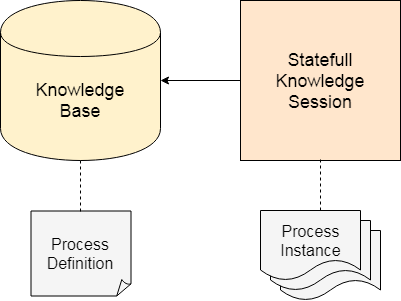
Core-Engine API is required to load processes and execute them. This API allows us to first create a Knowledge Base which include all our process definition that needs to be executed by the Session. This session has a reference to the Knowledge Base.
To understand the jBPM Core-Engine API, we need to understand the following basic definition:
Knowledge Base
A Knowledge Base is a repository of all the relevant process definitions. It contains rules, processes, functions and type models. It always helps us to look up the processes definition whenever necessary. A Knowledge Base can be created only once and it can be changed dynamically.
The following code shows the creation of Knowledge Base:
Session
A Knowledge Base contains a reference to the session. Whenever we want to start a process, we need to set up a session which is responsible for communication with the process engine. After setting up the session we are able to start the execution of our processes. Whenever a process starts executing, it creates an instance of that process and maintains the state of that process instance. A session can be created many times.
The following code shows the creation of Session:
jBPM Services
jBPM API provides a set of very-high level services. These services help to embed the Business Process Management capabilities into our application. These services delivered a complete set of modules. These modules are as follows:
- jbpm-services-api :It has only API classes and interfaces.
- jbpm-kie-services : It has the core implementation of the services which do not have any framework specific code.
- jbpm-services-cdi : CDI specific code is on top of Jbpm-kie-services
- jbpm-services-ejb-api : It provides remote capabilities to the interfaces.
- jbpm-services-ejb-impl : EJB specific code is on top of Jbpm-kie-services
- jbpm-services-ejb-timer: It supports time based operation. eg. Timer events, deadlines etc.
- Bpm-services-ejb-client : Interact with services over remote ejb invocation-currently available for JBoss only.
Some important services are:

Deployment Services
Its main responsibility is to deploy or undeploy units. It gives the information of available deployment units and their RuntimeManager instances.
Syntax to create, deploy, retrieve and get runtime manager
Definition Service
It is used to scan process definition that parses the process and extracts important information from it. This information provides the input to the system to inform users about what is expected. Definition Service provides information about:
- Process Definition
- Process Variable
- Service Task
- User Task
- Input and Output Information
Process Services
Process Services focused on runtime operations so use it only when there is need to alter process instance. It is used to give access to the execution environment that allows:
- Start new process instances
- Work with existing process
Runtime Data Services
This service refers to the runtime information of Process Instances. It is used as the main source of information.
- Start Process Instances
- Execute Node Instances
User Task Services
This service is used to manage the individual user task from start to end. User Task Service allows:
- Modify Selected Properties
- Access to Task Variables
- Access to Task Attachments
- Access to Task Comments
jBPM Processes
JBPM process can be easily understand with the help of BPMN.
What is BPMN 2.0?
- It stands for Business Process Model and Notation.
- It is based on OMG (Object Management Group) specification.
- It is similar to flowchart diagram.
- Its primary goal is to provide a notation that is readily understandable by all business users i.e. from the business analysts, to the technical person and finally, to the business users who manage and monitor those processes.
- It does not only define a standard on how to graphically represent a business process but also includes execution of semantic for the element defined and an XML format to store process definition.
- BPMN consists of different types of nodes that are connected with each other using sequence flows. BPMN consists of three different types of nodes. They are:
- Events: Start event, End events and intermediate events.
- Activities: Script task, User task, Service task, Business Rule task etc.
- Gateways: Divergent Gateway, Convergent Gateway
Process Creation
There are three methods available to create a process:
- Using the graphical BPMN2 editor
- Defining Process using XML
- By directly creating a process using the process API.
Using the Graphical BPMN2 Editor
BPMN2 is an Eclipse plugin. It provides an editor which allows us to create a process by using drag and drop option. After creating a node using drag and drop option we can edit its properties.
To open the BPMN editor in jBPM project, Right-click the directory where we want to keep our process and Select New, then click on file, give the file name and save it with .bpmn extension. This will open up the process editor which shows in the below screen.
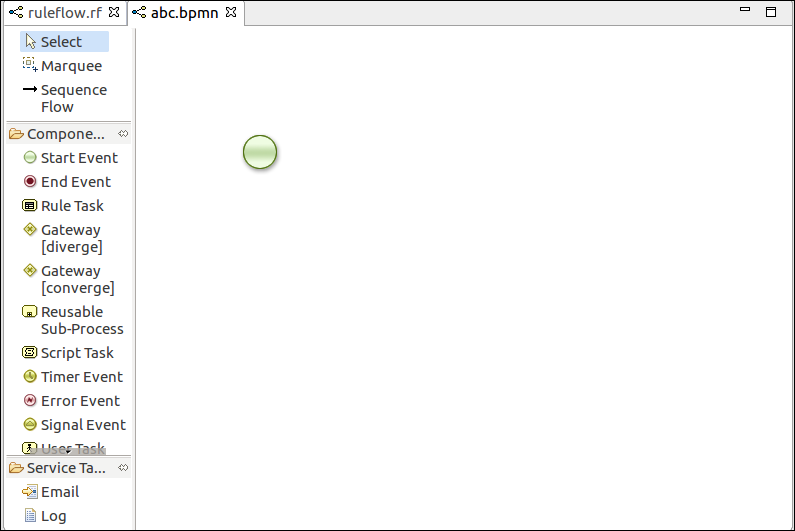
In this editor, we can create a process by adding node which represents the business logic that we want to specify in our Business process.
Defining Process Using XML
We can also specify the processes using BPMN2.0 XML directly. The syntax of these XML processes is defined by using the BPMN2.0 XML schema definition. The process XML file consist of two parts: The upper part and the lower part.
The upper part has the definition of the different nodes and their properties and the lower part has all graphical information. The process XML consists of only one element.
Example: Here, we create a process that contains a start event, a script task which print "Hello World" and an end event.
JBPM Process Designer
The first step that a business analyst requires for an application is the design and modelling of the business processes. It involves multiple artifacts apart from the business process flow itself. This section describes to design a business process with all its etiquette and helps to understand how the designed business process behave in a runtime environment.
jBPM provides a tool to design the business processes. These tools are -
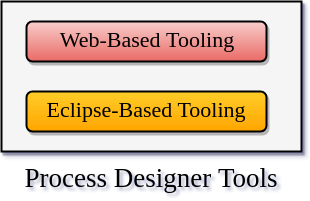
Web-based Tooling
Web-based Tool is an extension to the user interface framework provided for the Drools Guvnor knowledge repository. It provides a platform to create, maintain, and run multiple knowledge assets for a knowledge-based application.
In this section, we will focus on the business process definitions, process and task forms, and data models which is the part of the jBPM.
Process Modelling
In JBPM, the process designer is an integrated environment to design, validate, and simulate the business processes. The process designer has six distinct parts. These are as follows:

1. Object library
It is a palette of constructs that are used to build business processes. This library is arranged as a drop-down menu with the categories of constructs. Users creating a business process by choosing a construct from the palette drop the construct on the process canvas. Developer can also customize the object library by adding extended and customized tasks.
2. Process canvas
The process canvas is the workspace where we create the business process by drag and drop the BPMN constructs from the object library. The process designer helps us to create a business process and model them diagrammatically by ordering and placing the objects, resizing the objects, and changing the colour patterns. Once we drag and drop the object, we can see a tool menu around the object. These tool menu will be different for different objects.
3. Properties editor
In the process designer, each object has properties which can be customized. The Properties editor provides a way to the designer to set these details. The Properties editor panel for can be obtained by selecting the object. We can click on the canvas itself for setting the process level properties.
The properties editor has the following section -
- Core Properties - It contains the properties that are essential for a particular BPMN element.
- Extra properties - Extra properties are properties that are non-mandatory. For example, documentation for a task.
- Graphical Setting - In this setting, the designers have the flexibility to change the background, border, font colours, and the font size.
- Simulation Setting - Simulation properties settings are needed for creating the process simulation.
4. Toolbar
It contains a set of utilities for creating and maintaining a business process. Many diagram editors has some common utilities such as cut, paste, save, rename, delete, zoom etc. In process designer, most of the tools can be easily understandable by their name itself.
5. Problem visualization screen
The problems section provides the information about the syntactic and semantic errors in our application. We can also visualize a problem in a specific process by switching the editor into the validation mode. It can be accessed from the toolbar and clicking on Start validating will show a list of errors in the specific process.
6. Metadata
The Metadata tab provides the details of the business process artefact. It contains information such as the user who created and modified the artefact, the format of the artefact, and so on.
Form modelling
Form modelling provides a user interface for the human task. A business analyst can design a form which is used to capture the information attached to a task. The collected information through the form is mapped to the data output set of the human task.
We can specify a set of properties for each field included in the form which determines its runtime behaviour and its layout. The properties include the following -
- Size of the input text
- Properties for validating data integrity
- Maximum characters supported
- Password field or not
- Mandatory or not
- Read-only or not
- Pattern of the data expressed as a regular expression
- Properties for data binding
- Setting default values
Process Simulation
Process simulation can be used to analyse the runtime characteristics of a modelled business process. Process simulation helps us to do the following:
- Optimize the business process design by pre-execution
- Understand the performance characteristics of the business process by prediction and analysis.
- Understand the resource utilization of human actors involved in the business process.
- Continuously improve the business process design by minimizing the errors caused by a change.
Eclipse-based tooling
The web-based tooling primarily focuses on the business analysts. The business analyst cannot create an application on their own. They help the technologies to create an application. JBPM provides eclipse based tooling for the developers to create a completely functional application.
Importing a project created using web-based tooling
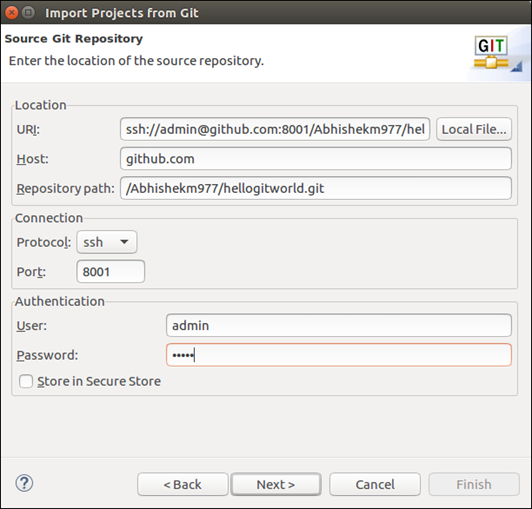
In this section, we will discuss how to import a project that was created in the process designer into Eclipse and continue working on it.
jBPM utilizes Git repository for default implementation. Git repository is a widely used source code management system. So, when we create a project by using web-based tooling, it actually creates a project in Git. Git repository provides a facility for collaborative working between users of web-based tooling and Eclipse tooling.
To import a project we should know the Git repository location that jBPM uses for the sample project -
- Log into web-based tooling, and go to the Project Authoring->Administration
menu. There will be a list of repositories and projects. - Select the Project. Here, we can see the Git repository URL. There will be two URLs available - one using the git protocol and the other for the ssh protocol.
- Copy the URL using the tooling available.
- Open Eclipse.
- Go to File->Import->Projects from Git. click Next, select URL, and click Next.
- A new window will open. Enter the ssh URL and authentication details.
- Follow the wizard to finish importing the project.
jBPM Human Task
Most of the business processes require human interaction. For example, a human may be needed for approvals, exception management and some other related actions. They are also responsible for performing activities required to enhance the business processes.
jBPM supports different types of human task nodes inside processes for modelling this interaction with human users. Human task node allows process designers to define the task properties which the human actors need to execute. jBPM also includes a back-end service that manages the life-cycle of tasks at runtime.
To use human tasks inside processes we need three components-

Human Task Life Cycle
From the process perspective, a human task is created only when a user task node is encountered during the execution of a process. Now the process will leave the user task node only when the associated human task has been completed or aborted.
The human task itself has a complete life cycle. The following diagram describes the Human task life cycle.
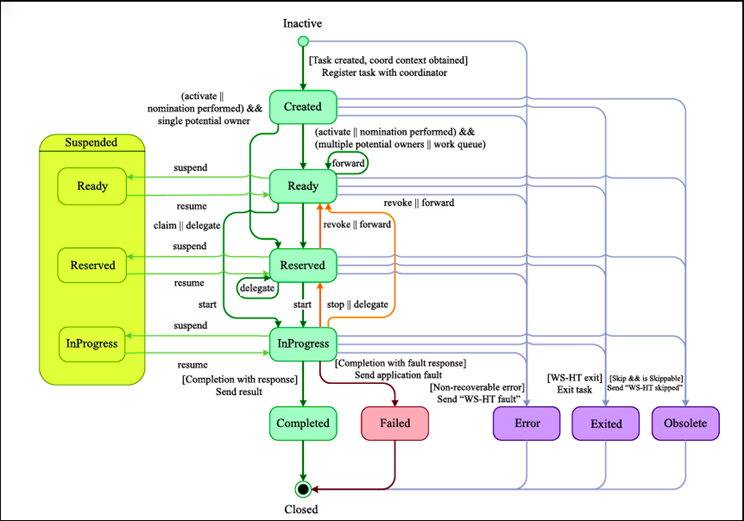
A new task starts creation in the "Created" stage. Then it will automatically go into the "Ready" stage. Here' task shows the task list of all the actors that are allowed to execute the task. The task will stay in a Ready stage until one of these actors claim the task to inform that they are executing it.
Once the user has claimed a task, the status is changed to "Reserved" stage. After claiming the task, that user can decide to start executing the task. In that case, the task status is changed to be "InProgress" stage.
Finally, once the task has been performed, the status is changed to be "Completed". If the task is not completed, the user can also indicate this using a fault response. In that case, the status is changed to "Failed".
The Human task Service allows a lot of other life cycle method, like-
- Delegating or forwarding a task. In that case, it is assigned to another actor.
- Revoking a task, it is no longer claimed by any specific actor but reappears on the task list of all the potential actors
- Temporarily suspending or resuming a task
- Stopping a task in progress
- Skipping a task. In that case, the task will not be executed.
jBPM Persistence and Transaction
jBPM allows the storage of certain information. jBPM persistence is a runtime persistence which persists the state of all our process instances and log audit information that is happening at runtime of the processes. The main purpose of persistence is to store process executions during wait states. This section describes the different types of persistence and how to configure them.
Runtime State Persistence
When a process is started, immediately its instance is created which represents the current execution state in that specific context. If something goes wrong during the execution of a process then it is necessary to store the process runtime state which helps to continue the execution of a process instance. For example, when we execute a process for sales order, one process instance is created for every sales request.
jBPM provides plug-in for different persistence strategies. The runtime state of an executing process can be made persistent. The persistence strategies allow restoring the state of execution of all running processes in case of unexpected failure.
To use persistence, we have to configure the process engine. This configuration will automatically store the runtime state into the database. We cannot trigger persistence itself. The process engine will take care of this when persistence is enabled. The engine will automatically reload process instances on demand.
Binary Persistence
Binary persistence mechanism is used to convert the process state instance information into a binary dataset. This mechanism is used to save or retrieve the process instance state from the database.
In Binary Persistence, two things happen when the process instance state is persisted-
- The state of process instance information is transformed into a binary blob.
- This binary blob is then store some other metadata with this process instance. This metadata includes the process instance id, process id, and the process start date.
Audit Log
The jBPM audit log stores the history log of execution information in a database using JPA. In many cases, it is useful to store information about the execution of process instances so that this information can be used later. For example, sometimes we need to-
- Verify which actions have been executed for a particular process instance.
- To monitor and analyse the efficiency of a particular process.
The history log of execution information is created based on events. It is possible because the jBPM runtime engine provides an appropriate mechanism to listen to events. The necessary information can easily be extracted from these events and then persisted to a database.
Transaction
The jBPM process engine supports JTA(Java Transaction API) transactions. It also supports local transactions by using Spring but does not support pure local transactions. In jBPM, it is necessary to provide transaction boundaries inside our application. If we do not give transaction boundaries inside our application, the engine will automatically invoke each executes method in a separate transaction. However, we can also specify the transaction boundaries itself. This allows us to combine multiple commands into one transaction.
To create user-defined transactions we need to register a transaction manager at the environment. The following sample code understand how to create transaction manager.
Persistence Configuration
Persistence can be used by configuring the process engine. Persistence configuration requires adding the necessary dependencies, configuring a data source and creating the engine with persistence configured.
Adding Dependencies
If we are using jBPM Eclipse plug-in, we have to make sure that the necessary JARs are added to our jBPM runtime directory. We can manually add the necessary dependencies in our project. To add dependencies manually, perform the following steps -
- We need the JAR file jbpm-persistence-jpa.jar.
It contains code to save the runtime state whenever necessary. - We need various other dependencies which depend on the persistence solution and database we are using. Some of the following dependencies listed below -
- jbpm-persistence-jpa (org.jbpm)
- drools-persistence-jpa (org.drools)
- persistence-api (javax.persistence)
- hibernate-entitymanager (org.hibernate)
- hibernate-annotations (org.hibernate)
- hibernate-commons-annotations (org.hibernate)
- hibernate-core (org.hibernate)
- commons-collections (commons-collections)
- dom4j (dom4j)
- jta (javax.transaction)
- btm (org.codehaus.btm)
- javassist
- slf4j-api (org.slf4j)
- slf4j-jdk14 (org.slf4j)
Manually configuring the engine to use persistence
Configure process engine, create a new knowledge session using JPAKnowledgeService
For example-
jBPM Component

This figure gives an overview of the different components of the jBPM Project:
Core Engine
The core engine is the heart of the Project and allow us to execute Business Processes in a flexible manner. It is light-weight Workflow Engine in Java that executes our Business Processes.
Human Task Services
Human Task Service is an important part of a BPM. It provides the Human Task life cycle if some task needs to be executed with the interaction of human actors in the business processes.
Persistence
It is a runtime Persistence which persists the state of all our process instances and log audit information about everything that is happening at runtime of the processes.
CDI/REST/JMS
It connects our application with the core engine through Java API or as a set of CDI services and also connects remotely through a REST and JMS API.
Process Designer
It allows business users to design and simulate Business Processes in a web-based environment. It provide a graphical editor for viewing and editing of our Business Processes by using drag and drop option. It also supports simulation of processes.
Data Modeler
It allows for the non-technical users to view, edit and create data models used in their Business Processes. The data modeler tool provides both logical and physical data models without the need for explicit coding.
Form Modeler
It allows us to create, generate and edit forms related to our Business Processes or during Task execution. This modeler tool help us to create forms without the need of any coding or templates markup skills. It provides WYSIWYG environment to model forms for the less technical users.
Rules Authoring
It allow us to specify different types of Business Rules for the combination of our Business Processes. These Business Rules are decision tables, guided rules etc.
Guvnor Repository
All types of assets used in the Business Processes are stored and managed on the Guvnor Repository.
Process Management
Process can be managed through the web-based management console. It includes features like managing our process instances i.e. start processes, stop processes and inspect the running instances, manage and executing Human Task lists and generating the reports.
Eclipse Developer Tools
It is a set of plugin to the Eclipse IDE and allow us to integrate our Business Processes in our development environment. It help us to create Business Processes using drag and drop option, test and debug our processes etc.
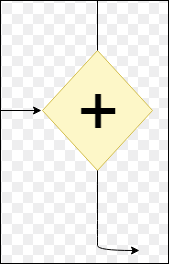
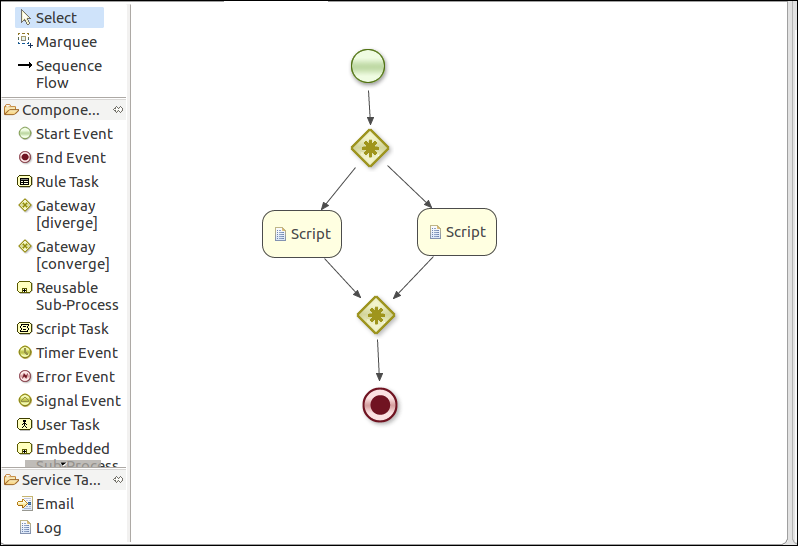
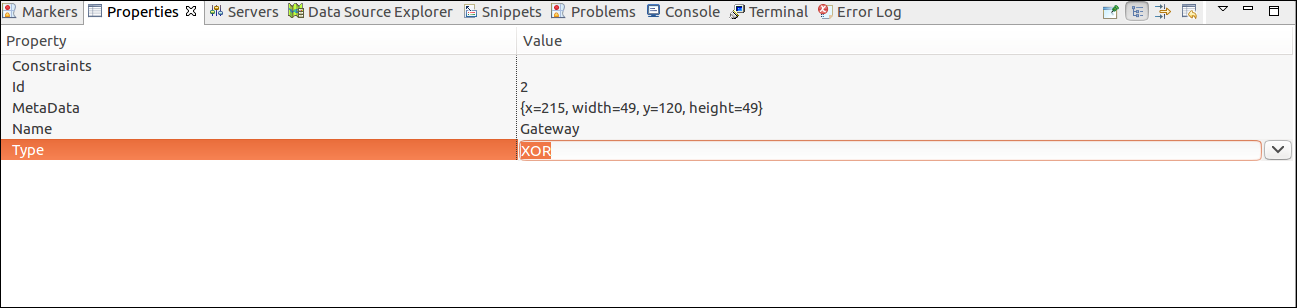
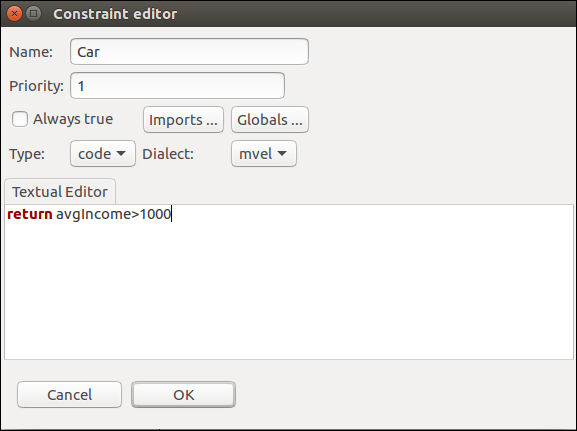
jBPM WorkFlow Component Start Event It is the starting node of the process. Every Process has only one Start Node. This node contains only one outgoing connection without any incoming connection. It has the following properties: Id: Id of the node. It should be unique also. Name: Name of the node. End Event It is the End Node of the process. A process can contain more than one End events. This node contains only one incoming connection and no outgoing connection. It has the following properties: Id: Id of the node. It should be unique also. Name: Name of the node. Terminate: Terminates an entire process or just a path. Rule TaskA Rule Task create a set of rules that need to be evaluated in our process. Every Rule Task has one incoming connection and one outgoing connection. The Rule Task is defined by using a Drools rule format in a separate file. It has the following properties: Id: Id of the node and is unique. Name: Name of the node. RuleFlowGroup: It represents the set of rules. Gateway [diverge]It allows us to create a new path in the process. It contains one incoming connection and two or more outgoing connections. It has the following properties: Id: Id of the node. It should be unique also. Name: Name of the node. Type: AND, XOR, or OR Constraints: They are linked to the every outgoing connection. There are three different types of Diverge Gateway node:
Gateway[converge]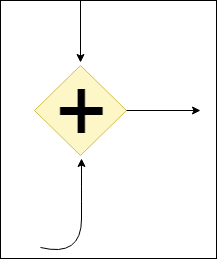 It synchronizes multiple paths into one. There are only one outgoing connection and two or more incoming connections. It has the following properties: Id: Id of the node. It should be unique also. Name: Name of the node. Type: AND, XOR, or OR There are three types of Convergent Gateway:
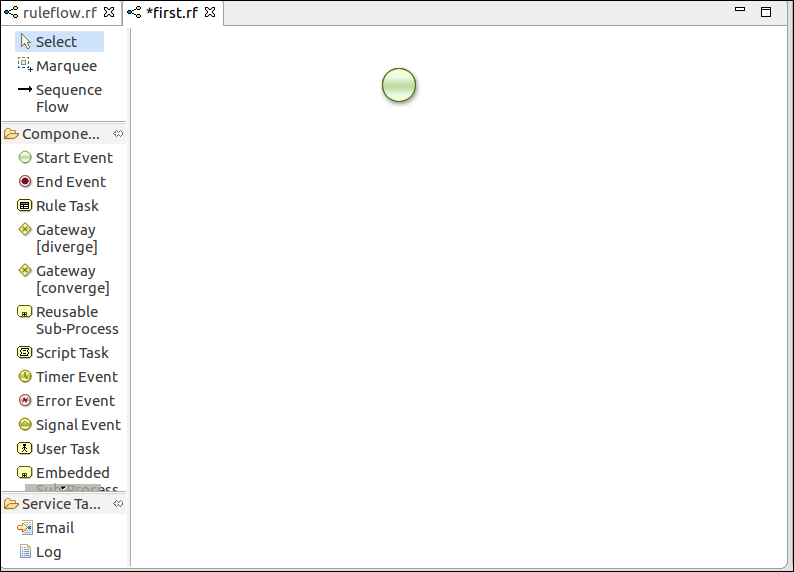
Reusable Sub-Process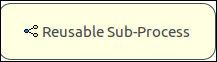 It calls another process from within the process. A sub-process has one incoming connection and one outgoing connection. It has the following properties: Id: Id of the node. It should be unique also. Name: Name of the node. ProcessId: Id of the process that will be executed. Wait for completion: By default it is true. The sub process will continue if the child process that was started is terminated its execution. Otherwise, it will continue after starting the sub process. Independent: By default, it is true. In this case, the child process will not be terminated if its parent process is completed. It is false only when "Wait for completion" is set to true. On-entry and On-exit action: It is executed on the entry and exit of the node. Parameter In/Out mapping: Sub-process node define in and out-mapping for variables. Script Task It is a node which executes a simple piece of code. It has one incoming connection and one outgoing connection. It has the following properties: Id, Name and Action. Timer Event This node sets the timer for the process. It triggers certain logic for a specified period of time or repeat an action at regular interval of time. Error Event It is used to throw an exception occur in the process. It has one incoming connection and no outgoing connection. It has the following properties: Id, Name, FaultName and FaultVariable. Signal Event It is used to respond to the event during the execution of the process. It has one incoming and one outgoing connection. It has the following properties: Id, Name, EventType, VariableName etc. User Task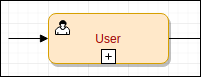 It is used to create a human task and is executed by the human actors to complete the process activity. It has one incoming connection and one outgoing connection. It has the following properties: Id, Name, TaskName, Priority, ActorId, GroupId, Content, On-entry and On-exit action, Parameter mapping, Result mapping etc. Embaded Sub-Process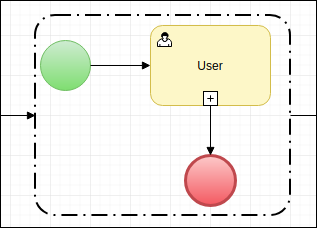 It is used to create a child process within a parent process. It is very useful for the larger process. A sub-process has one incoming and one outgoing connections. It has the following properties: Id, Name and Variable. Multiple Instances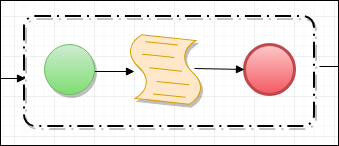 It allows us to execute the instance of a process segment multiple times, and at least one time for each element in a collection. It has one incoming and one outgoing connection. It has the following properties: Id, Name, CollectionExpression, VariableName, CollectionOutput, OutputVariableName, CompletionCondition etc. jBPM WorkFlow ValidationValidation is the action of making something legally or officially acceptable. To understand the WorkFlow Validation, we have to follow the following steps: Step 1. Open the blank rf or bpmn file.
Step 2. Draw an Event with the help of Component Palette and drag and drop it on the right hand side.
Here we take Start Event, Divergent Gateway, Convergent Gateway, Script Task, End Event, Sequence Flow etc. Above is a blank workflow and there is no description for any Events. Step 3. To check Validation Go to Windows -> Preferences -> Validation
Step 4. If any error found, we can see this in the Problems Area. Step 5. Now we will set the Properties for every Event Task. Select the Divergent Gateway and click on the properties, then select Type and select the Gate which you want. Step 6. Again select Constraints and click
Step 7. Click on Edit Button and Fill the details.
Step 8. Now Click on Imports Button and select the class on which we want to perform an operation. Here we will Import the Passenger POJO in our example.
Step 9. Do the same for another Node Script, following screen appears and Click OK.
Step 10. Now we select the Script Task and do the same as we do for Divergent Gateway. The screen appears as:
Step 11. Similarly, do the same for another Script Task.
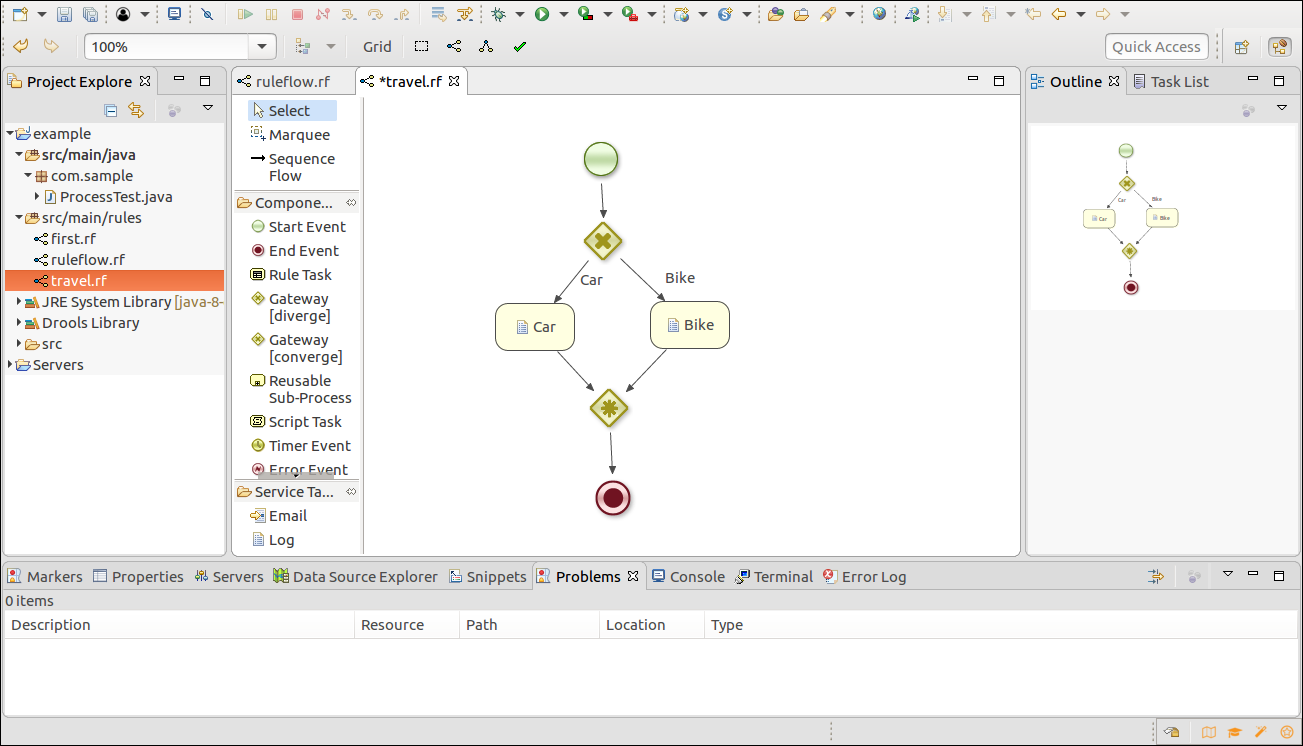
Step 12. Now we save the WorkFlow and Check for Validation. If any error found then check it again, otherwise, problem resolved. This process is the Workflow Validation created and resolved in jBPM5. jBPM WorkFlow ExampleWe will take an example of Passenger who will going to decide a Journey with a Car or Bike. We can understand the working of jBPM WorkFlow into practice with the help of following Step: Step 1: Open the blank .rf file in Eclipse editor and draw the following WorkFlow Component using Drag and Drop.
Step 2: Set the properties of every Event Task as we seen previously in the Validation part, the following screen appears. Step 3: Now we will change the ruleflow Id and set the variable in properties. To set the variable click on the action properties of variable, the following screen appears:
Step 4: Click on Add Button and Set the field as below screenshot.
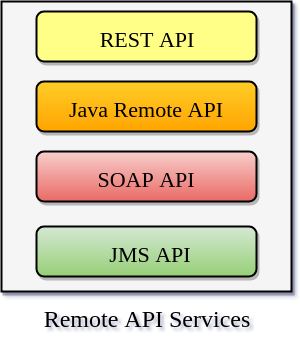
Step 5: Now our properties will look like below screen in which we had set the Id and Variable. Step 6: We do some changes in ProcessTest.java class file to run our process. We can see the changes in the bold font: Step 7: Now we create the Passenger.java file in the same package as ProcessTest.java Step 8: Now we run the ProcessTest.java file as Java Application and see the output. Step 9: Again we change the value in params.put() function and re-run the Java Application and see the change in output. jBPM as a remote serviceThe jBPM platform provides many remote APIs services. It provides developers with an improved level of flexibility in designing solutions that require jBPM integration. This remote APIs opens up a number of possibilities with a flexible, open architecture, in order to satisfy and to quickly react to changing application requirements. JBPM work with the following remote service APIs -
The REST APIThis API is used to manage tasks, process, create process instances, and other actions which require the use of a simple HTTP client library. It provides functionalities in the following areas - RuntimeEngine - It provides the user with process instance creation, process instance querying, and workitem operations. History - It provides with auditing data. Task - It provides task operation and task query methods. Deployment - It provides deployments management operations. AuthenticationjBPM provides authentication For the REST API. Upon invocation, the REST service operations check for the basic authentication user ID of your current HTTP session. If we are not authorized it will give an error, otherwise set user ID and password for authentication. This will return the following response- The remote Java APIIf we don't want to manually create HTTP requests to access jBPM remotely, then we can use Java API. The Java API is a high-level API. It uses REST or JMS API to interact with the remote engine services to provide the user with service API classes such as TaskService, KieSession and so on. The entry point of Java API is the classRuntimeEngine, and we can access it by using the class RemoteRuntimeEngineFacto Now, we have to access KieSession, TaskService and AuditService The SOAP APISOAP stands for Simple Object Access Protocol. It is a messaging protocol which allows a program to run on different operating system to exchange information using HTTP protocol. It allows us client-server communication. In this API, Clients can initiate requests to servers then servers process that requests and return responses to the user. Dependency-The Maven Dependency for SOAP API are as follows- Command Web ServiceIn this section, we will now describe how to call into jBPM by using its SOAP API. Our jbpm-remote-server test project, the SOAPTest jUnit test class, creates a web service client and then starts a new process instance. JBoss BPM Suite provides a SOAP interface in the form of CommandWebService. A Java client is rovided as a generated CommandWebService class. Classes generated by the kie-remote-client module function as a client-side interface for SOAP. The CommandWebServiceClient class referenced in the test code below is generated by the Web Service Description Language (WSDL) in the kie-remote-clientJAR. |


Comments
Post a Comment